TLDR;
Unlock e-commerce success with our comprehensive guide on creating an Amazon Seller Central Account. Navigate policies, gather documents, and follow step-by-step instructions for seamless account setup. Understand Amazon seller fees, optimize Amason product listings, and elevate your brand with insights and tools. Start your journey to flourish as an Amazon seller.
Introduction
Embarking on the journey of becoming an Amazon seller is a pivotal step towards unlocking the vast potential of e-commerce. One of this venture’s initial and crucial stages is creating your Amazon Seller Central Account. This blog is your compass through the intricate process, providing you with a detailed and insightful guide on your Amazon seller account.
In the evolving online retail landscape, Amazon marketplace stands as a global giant, offering a platform where businesses of all sizes can connect with a massive customer base. Whether you’re a budding entrepreneur or an established brand, understanding the nuances of setting up your Amazon Seller Central Account is the key to thriving in this competitive marketplace.
Join us as we break down the essential components of creating your Amazon Seller Central Account, offering practical tips, marketing strategies of Amazon, and insights to ensure a seamless and successful entry into the world of e-commerce. Let’s navigate this journey together, empowering you to not just establish a presence but to flourish as an Amazon seller. Ready to turn your aspirations into achievements? Let’s dive into the details!
Overview of Amazon Seller Central:
Amazon Seller Central serves as the nerve centre for businesses looking to establish and expand their presence on the world’s largest e-commerce platform. It is a comprehensive dashboard that empowers sellers with tools and resources to manage their products, inventory, orders, and customer interactions seamlessly.
Importance of Creating a Seller Central Account:
Creating an Amazon Seller Central Account on Amazon is not just a procedural step; it’s a strategic move that opens doors to a myriad of opportunities for businesses. Here’s a glimpse of the importance:
Market Access: Amazon Seller Central provides a direct gateway to Amazon’s vast customer base, allowing businesses to tap into a global marketplace.
Product Management: Amazon Seller gain control over Amazon product listings, pricing, and inventory, enabling them to optimise their offerings for maximum visibility and sales.
Order Fulfillment: The Amazon marketplace streamlines the order fulfilment process, ensuring timely shipping and enhancing customer satisfaction.
Marketing and Advertising: Amazon Seller Central offers tools for marketing and advertising, allowing businesses to promote their products effectively within the Amazon ecosystem.
Customer Insights: Sellers can access valuable data and analytics, helping them understand customer behaviour and market trends to make informed business decisions.
1. How to Prepare for Amazon Seller Account Setup?
A. Understanding Amazon Seller Policies:
Terms of Service (ToS):
-
-
-
- Dive into Amazon’s Terms of Service to comprehend the overarching rules governing seller behaviour.
- Familiarise yourself with the dos and don’ts, ensuring compliance with Amazon’s standards. To know more about Amazon’s terms of use, visit the official link here.
-
-
Product Listing Guidelines:
-
-
-
- Explore the specifics of creating Amazon product listings, including accurate product information, titles, and images.
- Understand the guidelines for prohibited items to avoid potential account issues. To know more visit the official site here.
-
-

source: amazon.com
Intellectual Property Rights:
-
-
-
- Learn about Amazon’s policies regarding intellectual property rights and trademarks.
- Ensure your product listings and branding adhere to these guidelines to prevent infringement issues.
-
-
Customer Communication Policies:
-
-
-
- Understand the rules around communicating with customers on the Amazon platform.
- Familiarise yourself with permitted communication methods and best practices for Amazon customer service.
-
-
Pricing and Competitive Practices:
-
-
-
- Explore Amazon’s policies on fair pricing and competitive practices.
- Avoid pricing violations and understand the rules for promotions and discounts.
-
-
Returns and Refunds:
-
-
-
- Gain insights into Amazon’s policies on returns and refunds. Visit official policies from here.
- Develop a clear understanding of how to handle customer returns while complying with Amazon’s guidelines.
-
-
Shipping and Fulfillment Requirements:
-
-
-
- Familiarize yourself with Amazon’s shipping and fulfilment & Amazon FBA policies.
- Plan your logistics to meet Amazon’s standards for timely and reliable order fulfilment.
-
-
Account Health Metrics:
-
-
-
- Learn about the key metrics that influence your account health.
- Understand how factors like order defect rate, late shipment rate, and customer feedback impact your Amazon seller performance.
-
-
Restricted Products:
-
-
-
- Identify and understand Amazon product categories that have restrictions or additional requirements.
- Ensure your offerings comply with any specific guidelines related to restricted Amazon products.
-
-

source: amazon.com
Policy Changes and Updates:
-
-
-
- Stay informed about any changes or updates to Amazon seller policies.
- Regularly check for announcements and updates to adapt your strategies accordingly.
-
-
B. Gathering Necessary Information and Documents
Setting up your Amazon Seller Account is an exciting step towards e-commerce success, and thorough preparation is the key to a smooth start. As you embark on this journey, gathering the information and documents required for a seamless Amazon seller account setup is crucial. Let’s break down each component:
Business Information:
-
-
-
- Legal Entity: Clearly define the legal structure of your business, whether it’s a sole proprietorship, partnership, LLC, or corporation.
- Business Name and Address: Provide accurate and consistent information matching your legal documents.
- Contact Information: Include a reliable phone number and email address for Amazon to communicate with you.
-
-

source: amazon.com
Tax Information:
-
-
-
- Tax ID or Social Security Number: Submit your Tax ID (EIN) or Social Security Number for tax reporting purposes.
- Tax Classification: Specify your tax classification, indicating whether you are an individual or a business entity.
-
-
Bank Account Details:
-
-
-
- Bank Account Type: Choose the appropriate account type (checking or savings).
- Routing and Account Number: Provide correct banking details to ensure accurate fund transfers.
-
-
Product Information:
-
-
-
- Product Details: Gather comprehensive information about the products you plan to sell on Amazon, including specifications, features, and applicable certifications.
-
-

source: amazon.com
-
-
-
- SKU (Stock Keeping Unit): Assign unique identifiers to each Amazon product for effective inventory management.
- Pricing Strategy: Determine your Amazon pricing strategy, factoring in costs, market competition, and desired profit margins.
-
-
Why Each Element Matters:
-
-
-
- Business Information: Accuracy in business details ensures a smooth verification process and establishes credibility with customers and Amazon.
- Tax Information: Providing correct tax details is crucial for compliance and enables accurate reporting of your earnings.
- Bank Account Details: Accurate banking information facilitates seamless transactions, ensuring timely disbursement of your funds.
- Product Information: Comprehensive product details enhance your Amazon product listings, attracting potential buyers and improving your overall visibility on the platform.
-
-
Pro Tips:
-
-
-
- Double-check accuracy: Verify the accuracy of all submitted information to avoid delays in the verification process.
- Organise Documentation: Keep your business, tax, and banking documents well-organized and easily accessible for reference.
-
-
2. Step-by-Step Guide to Creating an Amazon Seller Central Account
- Accessing the Amazon Seller Central Homepage
- Account Registration and Login
- Choosing the Right Amazon Seller Plan
- Understanding your VAT requirements
- Verifying or configuring Your Identity(Account)
- How to Enroll Your Brand After Login to Your Amazon Seller Account?
- Product Listings and Inventory Setup
- Understanding Amazon Seller Fees

source: amazon.com
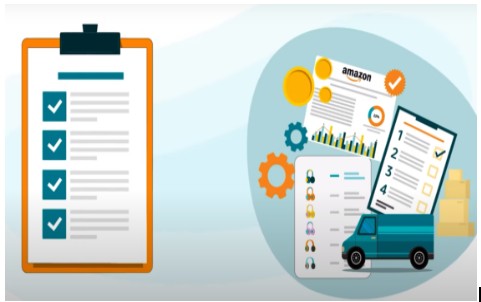
Before you create your Amazon Seller Central account, make sure you have the following:
-
-
-
- Bank account and routing number
- Internationally chargeable credit card
- Government-issued ID
- Tax information
- Phone number
-
-
source: amazon.com
To ensure a smooth setup process, make sure you have the following essentials at your fingertips:
1. Bank Account and Routing Number:
Before you embark on your Amazon seller journey, ensure that you have a valid bank account with an associated routing number. Amazon will use this information to deposit your sales proceeds directly into your Amazon seller account.
2. Internationally Chargeable Credit Card:
An internationally chargeable credit card is essential for handling transaction fees and any other charges associated with your Amazon Seller Central account. This card will serve as a primary method of payment for your Amazon seller account-related expenses.
3. Government-issued ID:
To verify your identity and comply with Amazon seller policies, you’ll need a government-issued ID. This can be a GSTIN Number, VAT number, driver’s license, passport, or any other official identification document issued by your national government. Please make sure the information on your ID matches the details you provided during the account setup.
4. Tax Information:
To comply with Amazon seller policies, Amazon requires tax information to ensure compliance with local and international tax regulations. Have your tax identification number (TIN) or other relevant tax information ready. This step is crucial for accurate reporting of your earnings and tax obligations.
5. Phone Number:
A valid and frequently accessible phone number is necessary for account verification and communication with Amazon. Make sure to use a reliable number that you can access easily, as Amazon may use it for two-step verification or to provide important updates.
Now, let’s dive into the step-by-step process of creating your Amazon Seller Central account:
A. Accessing the Amazon Seller Central Homepage
So, you’ve decided to venture into the world of e-commerce and set up shop on Amazon. The journey begins with accessing the Amazon Seller Central Homepage. Here’s how:
Visit Amazon Seller Central:
Open your web browser and go to the official Amazon Seller Central website according to your country E.g. If you are an Amazon US user then you need to visit https://sellercentral.amazon.com. Once there, look for the “Sign up now” option.

source: amazon.com
B. Account Registration and Login
Step 1: Navigate to Seller Central
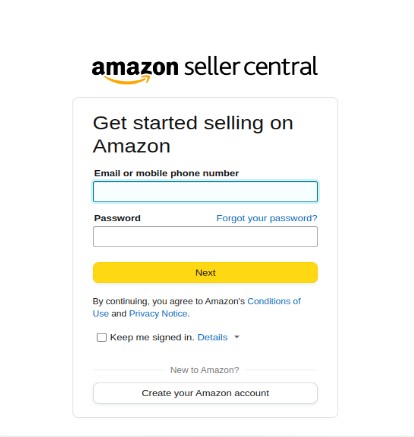
Visit the Amazon Seller Central homepage (sell.amazon.com). If you are a new seller, click on the “Sign up now” button to initiate the Amazon seller account creation process. This will take you to the beginning of your Amazon seller adventure. You need to fill in your required details such as email address, password, and other basic details required to create an account.
If you are a user outside the US, then you can visit other Amazon Seller Central websites. For example, if you are in the UK then you can visit this site (sell.amazon.co.uk).
source: amazon.com
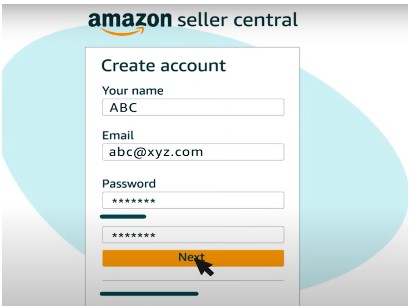
Step 2: Provide Your Email
Enter a valid email address that you will use for your Amazon Seller Central account. This will be your primary point of contact with Amazon.
Step 3: Set Up Your Password
Create a secure password for your Amazon seller account. Make sure it meets Amazon’s password requirements for optimal security.
source: amazon.com
Step 4: Complete the Registration Form
Fill in the required information, including your business name, address, and contact details. Ensure accuracy as this information will be used for shipping and customer communication.
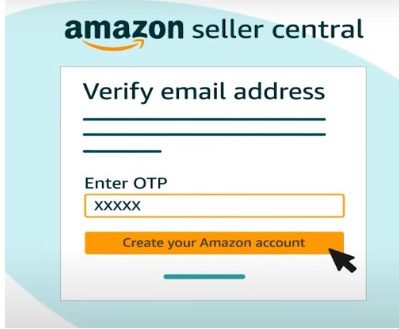
Step 5: Verify Your Email
Check your email for a verification message from Amazon and click on the provided link to confirm your email address.
source: amazon.com
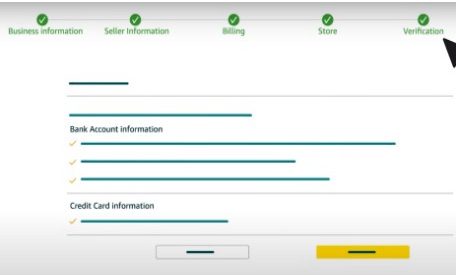
Step 6: Enter Tax Information
Provide the necessary tax information as prompted. This is crucial for proper tax reporting and compliance.
Step 7: Add Your Bank Account and Credit Card
Input your bank account and routing number for receiving payments. Additionally, enter your internationally chargeable credit card details.
Step 8: Verify Your Identity
Follow the prompts to verify your identity using the government-issued ID you prepared earlier.
Step 9: Set Up Two-Step Verification
Enhance the security of your Amazon Seller Central account by enabling two-step verification. This adds an extra layer of protection to your login process.
source: amazon.com
C. Choosing the Right Amazon Seller Plan
Now that you’re on the doorstep of Amazon Seller Central, it’s time to pick the right plan for your business model. Amazon offers two main seller plans:
1. Individual Seller Account:
-
-
-
- Ideal for small-scale sellers.
- No monthly subscription fee, but a fee per item sold.
- Suitable for those testing the waters or selling a limited number of products.
-
-
2. Professional Seller Account:
-
-
-
- Geared towards businesses with a high volume of sales.
- Requires a monthly subscription fee.
- Ideal for serious sellers looking for additional features and reduced fees per item sold.
-
-

source: amazon.com
Note: If you don’t plan to sell more than 40 items per month, an Individual plan is a great option. There’s no need to worry about selecting the right plan: you can switch or cancel anytime. Consider the scale of your operations and future growth plans when making this critical decision.
D. Understanding your VAT requirements
Depending on the nature of your business, you must register for a VAT number in a European country as per the regulations. This depends on multiple factors, some of which are the place of business establishment, the fulfilment model, and your annual sales. Having awareness of various VAT requirements, and knowing how to comply with them, will contribute to a frictionless selling experience on Amazon.
E. Verifying or configuring Your Identity(Account)
Here’s a quick guide to verifying and configuring your account settings:

source: amazon.com
Review and Adjust the following:
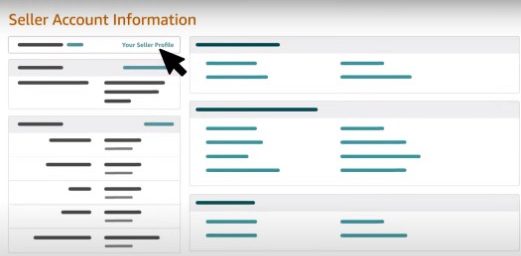
1. Public Amazon Seller Profile:
Your Amazon storefront’s first impression matters. Spruce up your public profile with a striking logo, an engaging bio, and accurate contact details. A polished profile builds trust with potential customers.
source: amazon.com
2. Payment and Business Information:
Double-check your payment details and pricing settings. Accurate information ensures smooth transactions, aligning with your business strategy.
3. Shipping and Returns Settings:
Customer satisfaction hinges on efficient shipping and clear return policies. Head to the “Shipping Settings” to set rates, delivery times, and return policies that work for you and your customers.

source: amazon.com
4. Tax Information and Settings:
Navigate to “Tax Settings” and verify your tax information. Stay compliant with local and international regulations to avoid any hiccups in the future.

source: amazon.com
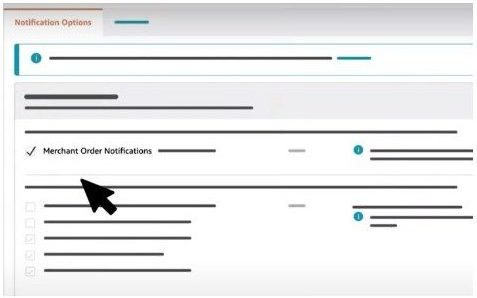
5. Notification Preferences:
Stay in the loop by customizing your notification preferences. Manage how and when Amazon communicates with you, ensuring you receive important updates about your Amazon seller account, orders, and promotions.
source: amazon.com
6. Login Settings:
Prioritize security by reviewing your login settings. Consider enabling two-step verification for an extra layer of protection. Regularly update your password to keep your Amazon seller account secure.
7. User Permissions:
If you’re working with a team, fine-tune user permissions in the “Settings” section. Clearly define roles and permissions to maintain control and accountability within your business.
F. How to Enroll Your Brand After Login to Your Amazon Seller Account?
Enrolling your brand on Amazon is crucial for sellers. It ensures control over listings, builds customer trust, and protects against counterfeits. With Brand Registry, you gain access to advanced marketing tools like Enhanced Brand Content and Sponsored Brands, boosting visibility. Analytics from Amazon’s tools offer valuable insights for strategic decision-making. In essence, brand enrollment is a strategic move for fortifying integrity, maximizing visibility, and leveraging powerful marketing tools for sustained success on Amazon.

source: amazon.com
1. Log in to Your Amazon Seller Central Account:
-
-
-
-
- Enter your credentials on the Amazon Seller Central login page and access your account dashboard.
-
-
-
2. Navigate to the “Brands” Section:
-
-
-
-
- On the Amazon Seller Central homepage, find and click on the “Brands” or “Brand Registry” section. This is typically located in the top navigation menu.
-
-
-
3. Click on “Enroll a New Brand”:
-
-
-
-
- Within the Brands section, locate the option to “Enroll a New Brand” and click on it to start the brand enrollment process.
-
-
-
4. Provide Brand Information:
Complete the required fields for brand information. This may include:
-
-
-
-
- Brand name
- Product category
- Country of manufacture
- Intellectual Property (IP) information (if applicable)
-
-
-

source: amazon.com
5. Verify Brand Ownership:
-
-
-
-
- Amazon may require verification of brand ownership. This can be done by providing:
- Trademark information
- Official documents proving brand ownership
-
-
-
6. Submit Brand Images and Content:
-
-
-
-
- Upload high-quality images of your brand logo, packaging, and other relevant branding materials.
- Provide detailed and accurate brand content, including a brand story or description.
-
-
-

source: amazon.com
7. Review and Confirm Enrollment:
-
-
-
-
- Review the information provided for accuracy.
- Confirm your enrollment to initiate the brand verification process.
-
-
-
8. Wait for Brand Verification:
-
-
-
-
- Amazon will review the submitted information and may conduct brand verification checks.
- Wait for confirmation of brand enrollment. This may take some time.
-
-
-
9. Access Brand Tools:
-
-
-
-
- After enrolling your brand. You’ll have greater control over the information on your Amazon product detail pages.
- You can access no-cost tools like A+ Content, Stores, Manage Your Experiments, and Brand Analytics, which can help you grow your audience and increase sales.
- You’ll enjoy automated protections for your brand and access to additional reporting options.
- Once your brand is verified, you’ll gain access to additional brand tools and features within Amazon Seller Central.
-
-
-
G. Product Listings and Inventory Setup
1. Adding Products to Your Catalog:
-
-
-
-
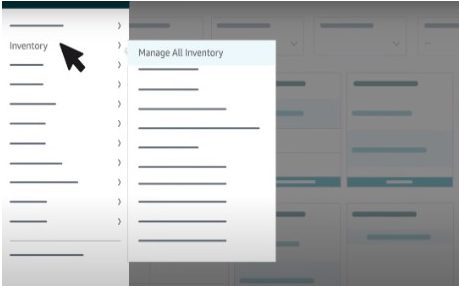
- Access your Amazon Seller Central dashboard and navigate to “Inventory” and then “Add a Product.”
- Choose between adding a product already on Amazon or creating new Amazon product listings.
- Choose between Amazon FBA or FBM listing to manage inventory.
- Fill in details like product title, description, images, and pricing.
- Amazon will take a maximum of 24 hours to show the live changes on the product page.
- Confirm and voilà, your product is live on Amazon!
-
-
-
2. Managing Inventory:
-
-
-
-
- Head to the “Inventory” tab to keep tabs on your stock levels.
- Utilize features like SKU codes and inventory reports for efficient tracking.
- Set up low-stock alerts to avoid running out of popular items.
- Optimize your inventory to align with customer demand and seasonal trends.
-
-
-
source: amazon.com
H. Understanding Amazon Seller Fees
1. Fee Structure:
-
-
-
-
- Dive into the “Pricing” section of your Amazon Seller Central account for a breakdown of Amazon’s fee structure.
- Familiarize yourself with referral fees, fulfilment fees, and any other applicable charges.
- Understand how different categories may have varying fee percentages.
-
-
-

source: amazon.com
2. Calculating Fulfillment and Referral Fees:
-
-
-
-
- Use the “Fee Preview” tool to estimate fees for specific Amazon products before listing.
- Consider the Amazon FBA program for streamlined shipping and customer service, factoring in associated fees.
- Regularly review your pricing strategy to ensure it covers both product costs and Amazon fees.
-
-
-
Conclusion:
In conclusion, creating your Amazon Seller Central Account is a pivotal step in establishing a thriving e-commerce presence on the world’s largest online marketplace. From understanding Amazon’s policies and preparing necessary documents to navigating the account setup process, this guide provides a comprehensive roadmap for both beginners and experienced sellers. For additional insights and valuable resources, consider exploring our professional Amazon seller account Management services at Epiphany Infotech to maximise your sales with effective product management. Wishing you a fulfilling and prosperous selling experience! Happy selling!
Anchal Narang works as a Digital Marketing expert at Epiphany Infotech in India. She specializes in On-page and Off-page SEO, with a particular enthusiasm for Amazon marketing management and PPC marketing. Beyond her professional role, she maintains an insatiable curiosity for the latest digital advertising strategies and technology developments.

